Lemoyne Star blocks the tips I have learnt | Sharon Keightley Quilts

Lemoyne Star blocks the tips I have learnt

February 13, 2021 8 Comments

Lemoyne Star blocks | Sharon Keightley Quilts

Lemoyne Stars have always been a favorite of mine, although they take a little time I think it is time well spent. 

I have gone through some of the pieces of scrap fabrics in my stash, finding some interesting combinations and started to make Lemoyne star blocks. At first just to play with the technique and then because I was having so much fun I kept making them until I had a pile. Now to decide what to make with all these gorgeous blocks.

Have you ever made these lovely stars? I always found them a little intimidating but with a few a steps that are tried and true I found them easy.

Here's how I went about making mine.

Tip #1  First is the cutting, it is important to take your time and make sure your cutting is accurate. Always include the lines on your ruler in the cut piece, So for instance if it is a 2 inch cut make sure the 2 inch line is included and not butted up against the edge of your fabric.

Tip #2 Layout all your pieces beside you at the sewing machine, in the order they are sewn to make the star.

Tip #3 A backstitch at the beginning and end of the seam is important when you press your seams open.

Tip #4 Use a fine piecing thread, top and bobbin. (my preference is a 60 weight polyester)

Tip #5 Press seams as you sew, I press my seams with a dry iron. Then when the block is finished I spritz the block with water and press the block to flatten the seams. Then leave the block under a tailors clapper until it is completely dry.

Tip #6 Don't fuss with sewing Y seams, its only sewing from one point to another.

laying out pieces for Lemoyne star blocks

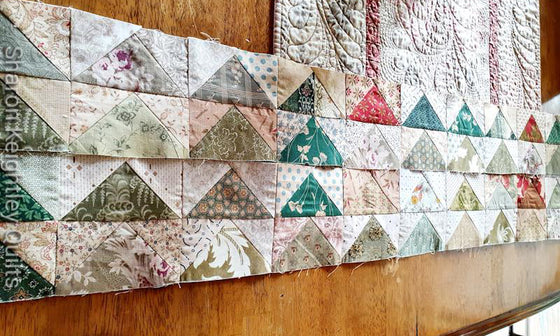
Here is my block pieces laid out as I am about to sew them.

Lemoyne star pieces sewn and pressed | Sharon Keightley Quilts

The first unit I sew together are the star blades and the side triangles. I sew all star blades for the block together, stopping a 1/4 inch before the end and doing one or two backstitches. Press the seams open with a dry iron. Then sew the triangle pieces on one side at a time, starting at the center and sewing to the outside of the block. Backstitching beginning and end in the same manner. Press the seams towards the star blades as you can see in the picture above using a dry iron.

Lemoyne star blocks in process | Sharon Keightley Quilts

In this picture I have sewn all the parts together for several blocks.

Half a Lemoyne star block | Sharon Keightley Quilts

I then lay out the pieces in the order they are sewn and sew two units together for each side of the star. Stopping 1/4 inch from the outside edge and backstitching.

Back side of Lemoyne star blocks in process | Sharon Keightley Quilts

Press seams open with a dry iron. 

Stack of half finished Lemoyne stars | Sharon Keightley Quilts

A stack of Lemoyne star halves ready to sew together.

Pieced and pressed center of Lemoyne stars | Sharon Keightley Quilts

Piece together the center seam, leaving 1/4 inch at each end and backstitching. I start sewing 1/4 inch from one side of the center and sew to the 1/4 inch mark at the end of the seam, then go back to where I started stitching and sew in the other direction to 1/4 inch before the other end of the seam and backstitch. I think it helps keep the center aligned sewing the seam in this manner. Check the where the center of the seam aligns before sewing the second half, in case you need to adjust it.

Back of finished Lemoyne star block | Sharon Keightley Quilts

Sew the outside squares to the block in the same manner as the triangles to finish the block. Press with a dry iron, then spritz the block with water (or I sometimes use flatter or Mary Ann's best press) and press again. I place a tailor clapper onto the block and leave it until the block is completely dry, this keeps my seams lovely and flat.

Lemoyne stars, thinking of a layout | Sharon Keightley Quilts

I need to sew more stars, but here is my layout so far, thinking about an applique center using this basket as my inspiration.

You can never have too many stars.....

Happy Stitching

Sharon

Please share this post with your quilting friends, the more the merrier as they say.

Keep up with all the posts via the Sharon Keightley Facebook page and group page. Instagram @sharonkeightleyquilts and the Newsletter will give updates of all blog posts.

If you have been following the Vintage Crosses sew along all the blog posts for the Sew Along are here

Sharon Keightley Quitls  Autumn Bouquet Book | Sharon Keightley Quilts

You can find more of my Quilty Ramblings blog posts on all things quilting here

Browse through my downloadable PDF patterns available here

See more of my video tutorials here

To keep up with my blog posts on the Quilty Ramblings blog, sign up to the newsletter below to have my blog post drop straight into your email.

Sharon Keightley Quilts

Related Posts

Making Vines for Adelicia Sampler Quilt Tutorial
Today I thought I would share my method for creating the vines in the Adelicia Sampler Quilt. I love how the vines ha...
Read More
Sewing Flying Geese Borders
Recently I have been sharing pictures on social media of the flying geese borders I have made for my sons quilt. Thes...
Read More
Sewing Flying Geese method four at a time
Flying Geese blocks four at a time, this is a great method to use. There are many traditional blocks that use four fl...
Read More


8 Responses

Sharon
Sharon

December 03, 2022

Hello, Hope

I am so happy that you enjoyed the tutorial on making Leymone Stars. This method works well for me and I love hearing that you also have had success after reading the tutorial. It made my day.
Sharon

Hope
Hope

November 13, 2022

THANK YOU THANK YOU THANK YOU!!! Finally after reading and DOING multiple different tutorials…this one WORKED! My first successful star, centers matched, points beautiful, and the right finished size after doing 9 others! And it actually was easier to put together.

Hope
Hope

November 13, 2022

THANK YOU THANK YOU THANK YOU!!! Finally after reading and DOING multiple different tutorials…this one WORKED! My first successful star, centers matched, points beautiful, and the right finished size after doing 9 others! And it actually was easier to put together.

Leisa
Leisa

February 16, 2022

There are many ways to make this star (and NOT the HST cheater method!). I think that experimenting and finding preferences is important. I have better luck joining all of my diamonds and then sewing the insets.

After a year long odyssey of trying several methods, I finally glommed together an approach that gives me perfect results every time. I slightly upsize my insets, clip the corner that snugs into the diamond (Marti Michelle’s Deluxe Corner Trimmer is MVP for marking and trimming) so that I have a perfect alignment. That tool also provides a great trim on the acute diamonds as well as perfectly marks the 135 degree angle on the diamond shoulder. Using upsized insets requires working from the inside of the corner out. I sew all diamonds together (press to one side on each and spin in the middle), then QST insets, then squares. There are so many seams in the block and bias, slightly upsizing the insets, ensures that no points are lost and the block finishes perfectly when trimmed.

I adopted Shar Jorgenson’s method of inserting the insets by sewing off the shoulders. It creates a perfect “X” seam at the “Y” seam…and it requires no further marking (of course the diamonds have to be marked for the lower join). You my need your stylus or tweezers to tuck the top diamond shoulder in the inset sandwhich out of the way. I love my eagle beak precision tweezers for this. SEwing off the shoulders also allows for chain piecing multiple units.

Sewing the corners in this way gives a perfect locking of your stitches for a strong, flat corner with no gaps. The two seams join exactly on the 1/4" point above the lower diamond join. It is a brilliant and effective method.

I now use Wonderfil 80WT for all of my piecing. This cottonized polyester gives me superior piecing results—same strength as 50wt cotton You might want to experiment with it.

Making these stars requires a trifecta of cutting/sewing/pressing accurately. I have also found pressing sheets invaluable to prevent shine on front.

Kari Lanting
Kari Lanting

October 31, 2021

Thanks so much! I started paper peacing these big diamonds pattern i had cit with freezer paper. Grandkids and life this was the only quilting I have done for the past 15 years! I had this wonderful scrape stack made with mostly old reproduction civil war fabrics! And I didn’t know what to do with them! Had lost my quilting partner and the pattern for this quilt! We are Texas ranchers and live quite aways from big towns. So we drove to Abilene to this wonderful quilt shop named Sew! One of the ladies took a picture of my blocks laid out in the star pattern and did a Google picture search and this blog of yours came up! It’s wonderful! Then the owner of the store Molly came over and explained how to proceed and was so helpful! Aren’t quilting ladies wonderful ❤️

Thanks for your wonderful pictures and blog! Can’t wait to finish this quilt!

Leisa
Leisa

August 31, 2021

I think that sewing a LS the traditional way is a great way to learn/improve/hone/master piecing skills. Thanks for contributing to this body of work.

Paula DiMattei
Paula DiMattei

May 23, 2021

I love using scraps for string piecing and EPP. Scrap quilts are my favorite quilts. So full of charm and fun surprises when you spend time exploring all the fabrics.

Susie coates
Susie coates

February 15, 2021

I once saw an easier way to make them and I’m sorry I did not save it.

Leave a comment


Also in Sharon Keightley Quilts - Quilty Ramblings

Making Vines for Adelicia Sampler Quilt Tutorial

June 28, 2022 1 Comment

Today I thought I would share my method for creating the vines in the Adelicia Sampler Quilt. I love how the vines have a little extra dimension using this easy method. Take a look at the video to see me working on the vines and talking about my process.

Continue Reading

Sewing Flying Geese Borders

May 20, 2022

How to press a Flying Geese Border ? This is the question I was asked so I have done my best to answer as it is not exactly what you might be expecting to see. Read more to see how I pressed the seams to get nice flat intersections. 


Continue Reading

Sewing Flying Geese method four at a time

April 27, 2022

Making four Flying Geese units at a time is a great time saver, and a wonderful method. I love to oversize the units and trim them down to the correct size for perfect blocks. Read how I go about making these versatile units that I use in almost every quilt I make.


Continue Reading