Vintage Crosses Quilt Sew Along week four. The applique center.
April 28, 2020
2 Comments

I hope you have had a great week, and have been progressing with your Vintage Crosses quilt. I would love you to share your pictures, either on the Sharon Keightley Facebook group or Instagram #vintagecrossesquilt, I am so looking forward to seeing your color choices and your blocks. This week is all about the applique center of the Vintage Crosses quilt.

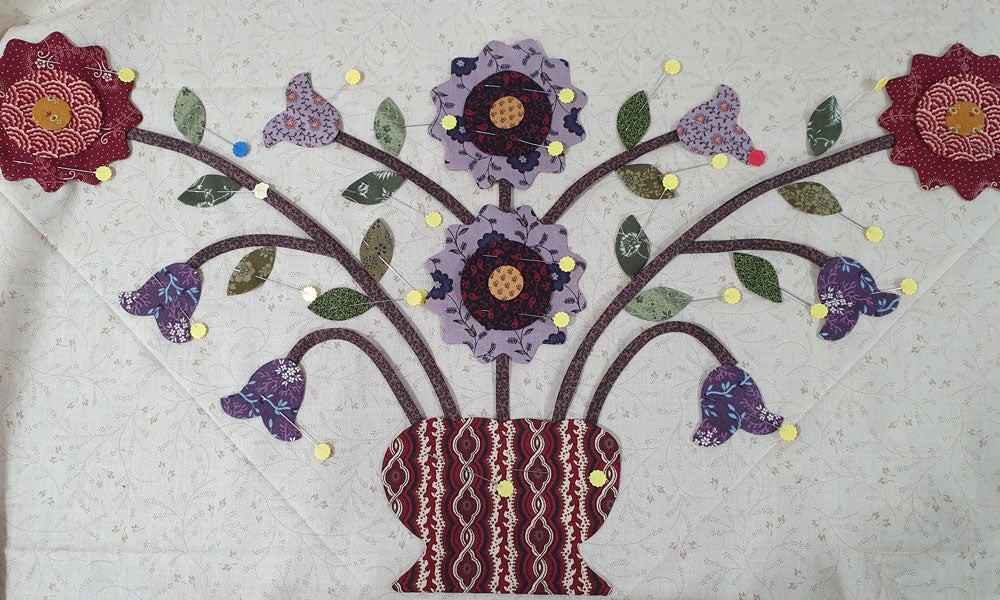
In the original quilt, I made the center in four separate pieces, joining them together after each applique section was completed. The reason for doing it this way was that it was easier to move the sections around under the sewing machine, I had a smaller machine at the time, and now that my sewing machine has a larger area between the needle and the arm of the machine it is much easier to move larger pieces of work. This time I have cut a large square in one piece, I will make the center as one piece instead of four separate pieces, the choice is yours which way you decide.
I have also decided to use only one background fabric for all of the applique blocks, including the center block.
So to start I have cut a large block, then ironed it in half and then on the diagonal, this helps with positioning the applique pieces. You will also need to take into consideration the outside seam allowance when positioning your outermost applique pieces. I have taped my layout sheet together for the applique center, the pattern sheet is a quarter of the applique pattern and you need to repeat it four times. I use this as a guide for making the applique pieces and basted them into place.

I have cut all the applique pieces from freezer paper, and confession time..... I have a cutting machine. It's a fabulous invention, it cuts all my pieces perfectly in less than half the time. I can also cut the fabric pieces too with the machine, but I mostly do this by hand as with most quilts I make I am never sure which fabric I will use until I get a few done and in place.


I am only basting one section at a time, then stitching it in place before basting the next section. I find it easier to move everything around while stitching when there is only one section to worry about. I use a combination of flower headpins and basting glue. I like to use flower headpins on the larger shapes, this gives me the option of moving them as I stitch if they are not quite in the right position.

I will be writing in more depth about stitching the applique pieces down in my next blog post so stay tuned. If you have any questions you would like me to answer, leave me a comment and I will try to answer them in my next blog post.


Keep Well and Happy Stitching
Sharon
Please share this post with your quilting friends, the more the merrier as they say.
Keep up with all the posts via the Sharon Keightley Facebook page and group page. Instagram #vintagecrossesquilt and the Newsletter will give updates of all blog posts.
There is a lot of information to cover, I will be re-making the entire quilt. I will be doing tutorial based blog posts for each part of the quilt top.
You will need to purchase a copy of the Vintage Crosses pattern, there are already many of you with this pattern, but if you do not here are a couple of places you can find it.
Le Patchwork d'Emma in France has printed patterns and on my website, you can purchase downloadable PDF patterns
All Vintage Crosses blog posts for the Sew Along are here


You can find more of my Quilty Ramblings blog posts on all things quilting here
Browse through my downloadable PDF patterns available here
See more of my video tutorials here
To keep up with my blog posts on the Quilty Ramblings blog, sign up to the newsletter below to have my blog post drop straight into your email.

Related Posts

Antique Red and Green sampler quilts have always held a fascination for me. I decided it was time to make my own and ...
Read More
Its been a while since I have written a blog post, we are currently locked down and you would think there would be ti...
Read More
Well I know I have talked about this topic before, you can read about my previous post here where I talk about using1...
Read More2 Responses
Leave a comment


Evonne Cook
June 09, 2020
What kind/brand of basting glue do you use, Sharon?