Sew along Week five. Its all about the quilting
November 14, 2019
3 Comments
These last five weeks have flown past, I have loved writing about the 'Treasures from the scrap bin quilt', seeing everyone's progress and reading all the comments.
This week is all about quilting the quilt.
Although I feel the quilting part of making quilts is not my strongest point, I do quilt all of my quilts. I am far more confident now and have learned so much over time. Every quilt is different, a new learning curve. Firstly there are a few things that I feel can make a difference when it comes to the quilting.
I like to stitch in the ditch in all the seams. But there are times when I have tried to skip this step and regretted it. It's a personal thing, I like the look when all the seams are stitched down and I feel it makes free-motion stitching easier for me. I do all the main stitch in the ditch lines with my walking foot. Then use the free motion foot and stitch in the ditch for the rest of the seam lines as I go.
I start in the center and work out.
Take your time when free motion quilting, slow stitching gives you time to think.
I stitch in the ditch around each applique shape, including the circles in the center of the flowers. Meaning every part of the applique NOT just around the outside. This brings the applique to life and gives it texture. I do this with free-motion stitching.
For the outside border, I stitch every seam in the ditch, this is all that is needed on this little quilt. But feel free if you want to add more.
Thread
Well, the thread you use is a big.......topic. My choice is to use a fine thread for all the ditch stitching. I like the quilting to add texture and not be a feature in the quilt, so I like fine threads.
My personal choice is the bottom line by Superior Threads in the top and bobbin for ditch stitching, and Bottom line in the bobbin and Sew fine by Superior threads in the top. I think it takes time to find a thread combination and choice that makes you happy. It's a very personal thing. The best thing to do is play on a practice piece, make a few blocks and sew them together, baste them in a quilt sandwich and play with the quilting until you find the thread combo that works for you. You can play with free motion quilting designs in this way also and find what design will work best for the blocks. Dense quilting on quilts takes time and concentration, it also makes the quilt firmer. Think about how you like your quilt to feel if you like it softer than less quilting will help with that. For this little quilt, I have chosen the less is the best option.
Needles
Always fit your needle to your thread, so in the case of using a fine thread use a fine needle. A heavier thread a larger needle.
Tension
Oh, the big.......question and the one I think gives the most headaches. Personally I struggled with tension UNTIL I learned that you need to adjust it for every type of thread you use. Meaning a finer thread requires and different tension than a heavier thread. This is for both the top and bobbin. If you have a fine thread, like the bottom line in your bobbin the tension will need to be different from a heavier thread. I know that sewing machine companies say the tension is automatic BUT..... how does the machine possibly know what thread you are using? It only knows the foot, and stitch setting you are using and adjusts the tension according to that. Once I learned to change my tension I had much better results. Even on my fancy machine.
Wind your bobbin slowly, make sure it is correctly wound. Nice and even. Do NOT put multiple layers of thread on the same bobbin.
Us a straight stitch plate.
There are some great videos out there on tension, here are some I think are fabulous and really helped me. Even if the video relates to a long arm machine, the theory is still relevant to a domestic machine.
Jamie Wallen This is fabulous when you are struggling with knowing how to tension your bobbin.
Top thread tension This video shows the top thread tension test for straight sewing but it is the same process for a quilt sandwich. This also relates to quilting or sewing over layers. Sew in the same manner on a quilt sandwich to adjust the top tension, try sewing a few loops as well.
Everything about tension explained This video talks about thread, needles, top and bobbin tension.
I hope you had fun watching those fabulous videos. Now let's get onto quilting the Treasures in the scrap bin table runner.
I have basted my quilt. Cleaned and oiled my machine, and put in a new needle.
The first thing I am going to do is stitch in the ditch. I have the Bobbin Line thread top and bobbin, choosing a neutral thread colour that blends in with all the fabrics and a 60/8 needle. I like a fine needle but you could also use a 70/10 needle as the fine needles need to be handled with care and can break very easily.
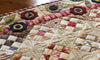
Here is my backing fabric, although not the best picture it has a slight purplish tinge and will look great on the back of my quilt. I have loved this fabric for a long time, I am so glad it now has a home.

I basted my quilt with safety pins, this is my preferred method. A topic that would be great for another post in the future maybe. I have used some leftover wool batting, I love the loft the wool batting gives to my quilting.

To start I stitch in the ditch, starting in the center and moving outwards. All the main straight seams.

When I stitched the seams on the inner border in the ditch, I dragged the thread over the applique and continued to stitch. Making sure I took tiny stitches to anchor the thread before dragging and then again when starting the stitching again. I clip all the threads top and bottom before I continue to the next step.

The rest of the quilting will be done free motion. This is the fun part.
I have two favorite feet, one is a ruler foot on the left and an open toe on the right.

I have my ruler foot on to stitch in the ditch for the Shoo Fly blocks. I find this is easier than using a walking foot as I can move around the shape easier. I always place my needle in the position first then align the ruler. I don't use gloves but love that matting for keeping things stable in the kitchen, I use it for extra grip on the ruler or the quilt top.

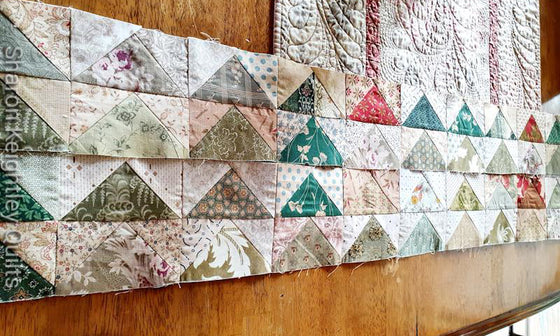
This little Shoo Fly is waiting to be ditch stitched, you can see how puffy it is.

This is how the Shoo Fly blocks look after being ditch stitched, they lay nice and flat.

As I progress with the free motion part of quilting this little quilt I will be posting next week about the quilting on the outer border and around the applique. This is quite a big topic to cover and I think it deserves a post of its own.
Thank you all so much for joining in the sew-along, I have really enjoyed seeing what you have all created and loved every minute of writing all the posts and remaking the Treasures from the scrap bin quilt.
I hope I have covered everything, please leave a comment, share your tips. If you have any questions I can answer them here.
If you are new to the sew-along take a look at previous blog posts for the sew-along here
All piecing instructions are on page 14 of the Autumn Bouquet book.
If you are still waiting for your book to arrive, don't worry..... there is still plenty of time. You can join in the sew-along at any time and work at your own pace.
I can't wait to share all my tips with you all and learn your tips too. Sharing the process is so much fun so please post pictures to my facebook group or Instagram.
You can follow along on the Sew Along via my blog posts, Facebook group and Instagram. There will be a hashtag on Instagram #treasuresfromthescrapbin you can post to or you can join my Facebook group so you can post your pictures there and share with everyone else in the group.
If you are signed up to my newsletter all information will be posted in the newsletters.
You will need to have a copy of my book Autumn Bouquet, for the Sew Along. You can find the book online a Martingale or Amazon or here on my website.
My Instagram is @sharonkeightleyquilts
Facebook Group link here
Thank you all for your wonderful comments, I love reading them and getting to know you.
I hope you will join in with the fun.
Happy Stitching
Sharon

You can find more of my Quilty Ramblings blog posts on all things quilting here
Take a look at some of the downloadable PDF patterns available
See more of my video tutorials here
To keep up with my blog posts on the Quilty Ramblings blog, sign up to the newsletter below to have my blog post drop straight into your email.

Related Posts

Recently I have been sharing pictures on social media of the flying geese borders I have made for my sons quilt. Thes...
Read More
Flying Geese blocks four at a time, this is a great method to use. There are many traditional blocks that use four fl...
Read More
Part Two
If you missed part one you can find it here.
Just to refresh, in part one we talked about the notions I us...
Read More3 Responses
Leave a comment


Sharon Keightley
November 22, 2019
Hello Martha
Thank you for the lovely comment. In answer to your questions, for stitching in the ditch I use a 60 weight polyester thread top and bobbin. My choice is the bottom line by Superior threads. I use a 60/8 microtex sharp needle or if you are new to using small needles try a 70/10 first, as the small needles break very easily. As far as burying threads, if you are thinking of placing your quilt in a show, then yes it is a good idea to bury your threads. If not you can get away with taking a few (4) very small stitches either end of the dragged thread (each side of the applique) to stabilize the stitches and then clip the excess thread away, top and bottom. This is what I mostly do and find it works for me, but I very rarely enter my quilts into shows.