Sew Along Week Four
November 07, 2019
6 Comments

It has been wonderful to see all the great pictures of everyone's progress in the Facebook group and Instagram #treasuresfromthescrapbin, all the different quilts are taking shape, so fun to see. Thanks so much for sharing.
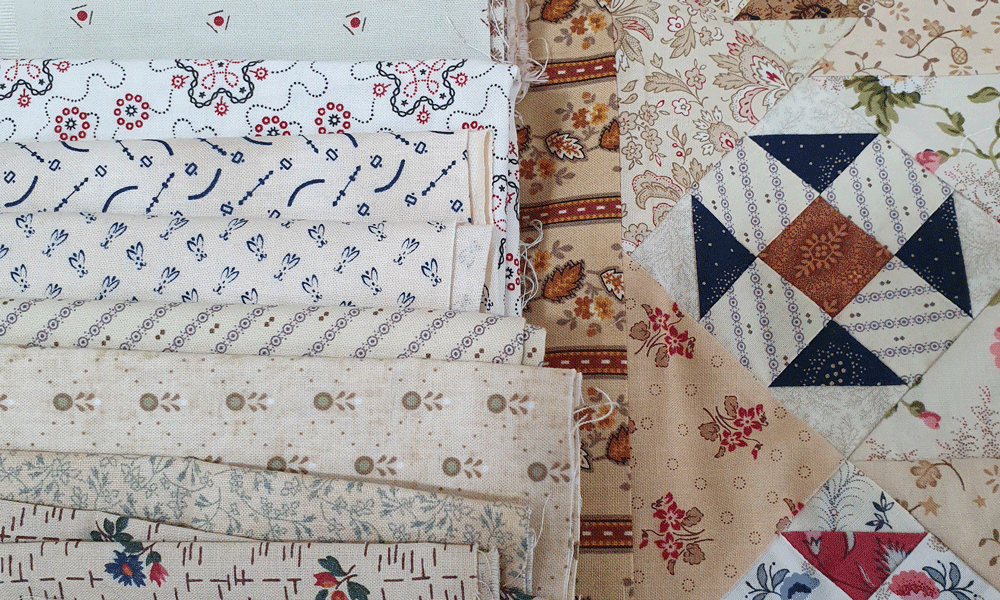
When adding the borders, it always amazes me when the next step is added, how the choices of fabric can change the look of the quilt. This is true for the first inner border, although it is only a small addition it is a game-changer. Quite often with a lot of my smaller quilts, I like to use more than one fabric in the inner border. Mixing it up can create a really nice look. I love the look a stripe fabric can give, so I searched in my stash to see what I could find. The original quilt I made had a mixture of red/pink coloured stripe fabrics, but this time I found some lovely browns and gold stripe fabrics that worked a treat with my Shoo Fly blocks.

After trimming up the quilt center. When adding the inner borders, I like to cut my border fabric a little larger than the measurement of the quilt. I measure the quilt center lengthwise and widthwise to get my measurement. Then cut my border strips approx and inch larger. Then I fold the strip to find the center and match it with the center of the quilt. I then pin each end, then place pins in the middle of each side, working my way with pins until I have the border pinned in place. Leaving the excess fabric extending past the end of the quilt at each end. Then I sew the border in place slowly removing the pins as I go. When I am happy with the way the borders are sewn I trim the excess fabric off at each end.


In the photo above you can see how I use the line on the ruler to make sure everything is aligned correctly before trimming.
After adding the inner border, I then focused on selecting fabrics to sew the strips needed for the outer border. The reason I decided to use a striped border in the original design is that I felt with the center blocks and inner border having a scrappy look, a single fabric on the outside border would make the quilt look flat. To keep the scrappy look I felt it needed a large selection of fabrics. I love how this idea worked out and I use this concept in a lot of my quilt designs.

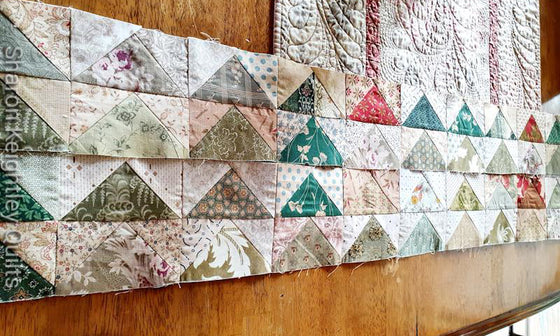
Sewing the strips. I sew the strips together starting in four groups of two, adding to each group as I go. Building the four borders. Eliminating the need to use a thread catcher as I chain sew each group through the machine, choosing random selections of strips to get a very scrappy look. YOu can see that some of my fabrics are a little darker and more interesting than others, this is what adds to the effect.

I press the seams open. This helps to keep them flat under the applique.


Pin placement.

Sewing the borders to the quilt center. I pin the borders onto each side as with the inner borders Stitching slowly and removing the pins as I sew. Making sure the edges of the border and quilt center are aligned.

Applique
Firstly I have turned the edges on all the shapes. I love this part, choosing the fabrics and making up the components to form the applique shapes. I used the freezer paper method that is in my book, you can also learn about my applique methods and detailed pictures of how I build my flowers before they are stitched in my PDF e-book here.
I started with the circles. I used a little dab of water-soluble glue to stabilize the paper side of the freezer paper to the fabric. I often use pins instead, depending on the size of the circle.


Then I made the flowers in the same way.

Layering and stitching the circles to complete the flowers. This is demonstrated in my book on pages 78 and 79.

Here is the back of the flowers now ready to sew onto the quilt.

Now that I have all my applique units ready to sew, I have made the stems as on page 75. I basted down the pieces with large flower headpins by eye using the picture of the quilt as my guide. You can also glue baste at this stage, but I prefer pins, they give me the flexibility to move anything around if I need to, without the need to wash out any glue substances after the quilt is made.


Then stitched it all in place. I work one corner at a time, where the stem sits under one flower at each side, in the middle of the top and bottom, I leave the flower unstitched until all the pieces are stitched down. I often reuse the templates and this is why there is a flower missing in the next picture. I will make this one after the paper has been removed.

The stitching technique, stitch I use and settings are also in the book on pages 78 and 79.

To remove the paper I either take it out as I sew as in my blog post here. Or I take it out after they are all stitched in place by cutting away the background fabric underneath as explained in my book section 7 page 79. The machine stitching is close, firm, secure, even and strong. Taking away the backing fabric also helps to remove bulk with the build-up of layers and makes machine quilting easier.
Well, I feel like I have written a marathon, sorry for the long post but I wanted to make sure I covered everything. After looking at the dates I had given you I see I had a little mix up so this is two weeks all at once.
The next week will be the last week of the sew-along, I will talk about how I am going to quilt this little quilt. 14th November. I can't believe we are already so far along, I have had such a great time writing the blog posts for each week. I am thinking maybe I should do this for all the quilts as I am making them and you might like to sew along with me as well. I would love to hear your thoughts.
Now finally the winners of last weeks giveaway are........ Debra Harry and Kim Congratulations!
Please take a look at our fabulous sponsor's website for more quilty goodness. Sentimental Sitches
I hope I have covered everything, please leave a comment, share your tips. If you have any questions I can answer them here.
If you are new to the sew-along take a look at previous blog posts for the sew-along here
All piecing instructions are on page 14 of the Autumn Bouquet book.
If you are still waiting for your book to arrive, don't worry..... there is still plenty of time. You can join in the sew-along at any time and work at your own pace.
I can't wait to share all my tips with you all and learn your tips too. Sharing the process is so much fun so please post pictures to my facebook group or Instagram.
You can follow along on the Sew Along via my blog posts, Facebook group and Instagram. There will be a hashtag on Instagram #treasuresfromthescrapbin you can post to or you can join my Facebook group so you can post your pictures there and share with everyone else in the group.
If you are signed up to my newsletter all information will be posted in the newsletters.
You will need to have a copy of my book Autumn Bouquet, for the Sew Along. You can find the book online a Martingale or Amazon or here on my website.
My Instagram is @sharonkeightleyquilts
Facebook Group link here
Thank you all for your wonderful comments, I love reading them and getting to know you.
I hope you will join in with the fun.
Happy Stitching
Sharon

You can find more of my Quilty Ramblings blog posts on all things quilting here
Take a look at some of the downloadable PDF patterns available
See more of my video tutorials here
To keep up with my blog posts on the Quilty Ramblings blog, sign up to the newsletter below to have my blog post drop straight into your email.

Related Posts

Antique Red and Green sampler quilts have always held a fascination for me. I decided it was time to make my own and ...
Read More
Its been a while since I have written a blog post, we are currently locked down and you would think there would be ti...
Read More
Well I know I have talked about this topic before, you can read about my previous post here where I talk about using1...
Read More6 Responses
Leave a comment


Coll
November 21, 2025
I have this incredible book, I made these for my family members, love all of it and thanks you so much