Progress on Treasures from the Scrap Bin Table Runner
September 23, 2016
4 Comments

Progress on Treasures from the Scrap Bin Table Runner...........
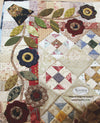
It's applique fun today with Treasures from the scrap bin table runner. All the flowers are prepped and stitched together before placing them onto the border of the quilt. Take a look at this tutorial to see how I make my flowers.


My leaves are all cut out and ready to turn the edges.

Edges turned and ready to baste.

My leaves vary in colour, using yellow/greens along with blue/greens. Poison yellow-greens or chartreuse greens always add a little zing. I also like to have a good selection of light medium and dark. Although this is not a realistic quilt, remember nature mixes many colours together in the garden.
All vines are made with the clover 1/4 inch bias maker. i use a steam iron to keep them from unfolding although I find I need to use them within 24 hours. Otherwise, if I need my vines to stay in place longer before stitching them into place I use a little spray starch on them before running them through the bias tape maker. You can see how in this tutorial.
I now have one corner of the quilt border basted and ready to stitch. A little tip when basting applique pieces onto a pieced quilt top, remember to make sure your seams are flat underneath the applique.
My preference is to stitch the applique down invisibly by machine, but at this stage, you can stitch by hand.

In the past, I have used glue, starch and wash away fusibles when preparing my applique but now I do NOT use glue or starch to turn the edges of my applique pieces, therefore I only have the fabric in my quilts.
The quilt I am working on is a called 'Treasures from the Scrap Bin' it's a table runner. I love that all the fabric has come from my scrap bin. I am currently writing the pattern for this table runner and hope to have it available for download when the quilt is finished.
Update! You can find the pattern for Treasures From the Scrap Bin in my new book Autumn Bouquet here.
I hope you enjoy my tutorials. I am currently working on a tutorial for the leaves. I will keep you all updated in the Pine Valley Quilts Newsletter.
Update on the leaf tutorial, a new e-book available with full step x step instructions on the applique technique I use. You can find it here.
Happy Stitching
Sharon

You can find more of my Quilty Ramblings blog posts on all things quilting here
Take a look at some of the downloadable PDF patterns available
See more of my video tutorials here
To keep up with my blog posts on the Quilty Ramblings blog, sign up to the newsletter below to have my blog post drop straight into your email.

4 Responses
Leave a comment


Cheryl Horton
December 23, 2020
Love the colors and designs.