I hope you have not given up on me as I have been away from the blog for a while. I assure you I have been busy working on new designs and playing with video's too.
The quilt I am working on currently uses beautiful fabrics designed by Minick and Simpson called Grand Traverse bay. The design was sparked by an antique quilt I saw using the 'T' block in indigo blue and white fabrics. I immediately thought of the beautiful Minick and Simpson fabrics I had purchased.
I did some research on the 'T' block and found a big T block I loved, arranging them in a straight set for the center of the quilt. The antique quilt did not have a border and only had 'T' blocks, but I thought my quilt would look better with an applique border.
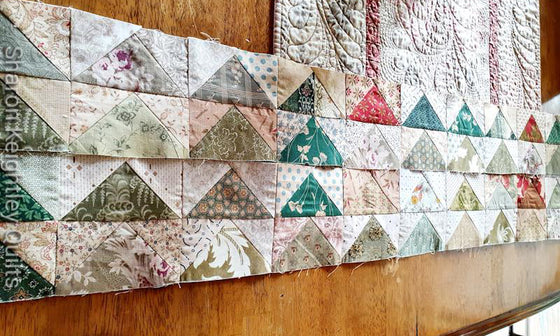
I started cutting all the triangles, and arranging the fabrics in various combinations of colour.
Piecing the blocks together was fun, not a hard block to make.
Arranging the blocks, all the fabrics looked great together.
Now on to the applique border.
Making the flowers and stitching the layers before appliqueing them to the border using Aurifil 80 weight thread and stitching invisibly by machine.
The final design of the finished quilt. The pattern is coming soon .......
If you can think of a name for my quilt, that would be great ! I am always stumped when it comes to naming my quilts.
I have been playing with the video while making applique flowers. I thought you might to take a look at part one of how I turn the edges for the applique flowers.
I would love to know what you think, I am so new to video and to be honest it scares me a little.
Happy Stitching
Sharon
P.S The pattern will be available soon for this quilt. Take a look at my other patterns available here at Pine Valley Quilts
Thank you for the video. I don’t usually watch videos but this interested me very much. Now that I’ve started doing flowers a lot I intend to do them this way. Thank you again.
Colleen
September 13, 2017
So beautiful! I can’t wait to get this pattern. Will it be available to the U.S.? (I should have seen this video before I watched Part 2. Oops!)
Christine Hiller
September 11, 2017
Superb video – very clear and concise. Love the technique – sew easy, I think even I can do it !
susan
September 09, 2017
How about T-rue Blue Wonder…..this is a beautiful quilt.
Pat Springall
September 05, 2017
Loved your video. Can’t wait until you do the next one when you put your flower together. Not sure when you take out the paper on your circles.
Sue Rogers
August 20, 2017
I signed up to receive your blog posts/newsletter, but have not been receiving them. When I tried signing up again, it said I was already subscribed. Can you help??
Thank you!
Joy
August 17, 2017
Great video! I enjoyed seeing HOW you ironed the edges in place to obtain crisp edges. Gives me courage to try it as well. Only 1 question- do you remove the freezer paper at some point, and if so when? I also await your pattern for this quilt, as well as the remaining videos for the rest of the appliqué. As a newby to appliqué, I really need these to have the courage to proceed. Thank you much.
sue
August 15, 2017
Great video Sharon. You explain it nice and slow, so its easy to follow. Looking forward to next video to see how to layer with the freezer paper! Thanks.
sue
August 15, 2017
Video is excellent Sharon. Nice and slow and easy to follow. Looking forward to your video where you layer the pieces for the flower. What to do with the freezer paper is alluding me. haha|!
Judy
August 14, 2017
Thank you for the video. Do you take the freezer paper out before you stitch down? If you do how do you prevent the edge from coming back up and not sitting under.
Christy
August 14, 2017
Wonderful video! I will have to give this a try. I hope you are able to do a video on the actual machine applique invisible stitch that you use. I could use all the help I can get!
Lin
August 14, 2017
Loved your video. Looking forward to your next. Your quilt is lovely. Reminds me of Blueberry Cheesecake.
Liz
August 14, 2017
Thanks so much, I will be trying this!
Shaun
August 14, 2017
Thank you for the great video tutorial! I think I will try this method for preparing appliqué. I’m looking forward to your next video.
Leave a comment
Also in Sharon Keightley Quilts - Quilty Ramblings
Today I thought I would share my method for creating the vines in the Adelicia Sampler Quilt. I love how the vines have a little extra dimension using this easy method. Take a look at the video to see me working on the vines and talking about my process.
How to press a Flying Geese Border ? This is the question I was asked so I have done my best to answer as it is not exactly what you might be expecting to see. Read more to see how I pressed the seams to get nice flat intersections.
Making four Flying Geese units at a time is a great time saver, and a wonderful method. I love to oversize the units and trim them down to the correct size for perfect blocks. Read how I go about making these versatile units that I use in almost every quilt I make.


Jan Vincent
July 27, 2025
Beautiful work.