Ever wondered how to remove the applique freezer paper templates, without cutting the background fabric ?
September 01, 2019
7 Comments

Hello Everyone
While working on a new quilt for my soon to be born granddaughter I decided to do a tutorial. On some quilts, especially those with pieced backgrounds, I like to remove the freezer paper as I invisibly machine stitch down the applique piece. Instead of cutting away the background afterward. This little tip is not in my book,(Autumn Bouquet) as there are only so many pages. I could go on forever about applique!
I am loving using the gorgeous bright and happy fabrics, mostly designed by Denise Schmidt. You can see them here and here on her website. Quite a change for me.
The border for this quilt has applique! Of course.......
Beautiful colorful bright flowers, and lots of leaves that remind me of licorice allsorts.


You can find information on turning the edges of the applique in my new book Autumn Bouquet, Link for the book is above. Or under the tutorial tab on my website under applique videos here.
Ok, let's get started.....
Firstly I pin the leaves in place. I like to use these long flower headpins by clover or Bohin. The direction the pins are facing is also important, this means I can start stitching the leaf on the opposite side of the pins.

I start stitching on the bottom of the opposite side of the pins before the point, this way I can sew around the two points and stop on the top on the opposite side from the pins.

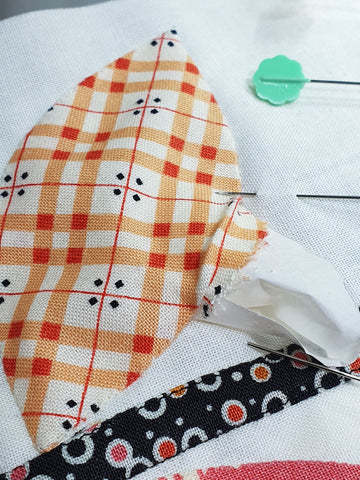
I stop stitching with a backstitch and leave a small gap as shown with the placement of the two pins in the picture below. The bottom pin is where I started and the top pin is where I finished.

I then use a wooden cuticle stick to release the seam allowance from the freezer paper. Lifting the seam allowance just enough to allow me to get tweezers in to grab the freezer paper template and pull it out.

I then take the freezer paper out of the work. As I do not use glue or starch to hold the freezer paper in place, removing it is a breeze.

The removed template can be re-used many times as it is still intact. I then finger press the seam allowance back in place and continue the stitching on the leaf to finish it.

Here is what it looks like on the back.

As the Flowers are pre-stitched before placing onto the border, the only freezer paper templates to remove are the petals, this is done in the same manner as the leaves. Removing the freezer paper templates from the petals will be shown in a future blog post, so keep tuned. You can read more about how to do pre-stitch the flowers in my book Autumn Bouquet or in my e-book (Applique! Creating and Stitching Perfect Applique)

I hope you join me for planned Sew Alongs in the future, starting with some of the quilts in my book Autumn Bouquet. It's going to be so much fun!
Don't forget the Nine Patch sew along too..... I have been working hard on my Nine Patch blocks and can't wait to show you what I am making. I have three patterns coming out soon to get you all fired up, to make loads of these timeless blocks with all your scraps. Read more about it here.
I hope you have enjoyed my ramblings and pictures
Happy Stitching
Sharon

You can find more of my Quilty Ramblings blog posts on all things quilting here
Take a look at some of the downloadable PDF patterns available
See more of my video tutorials here
To keep up with my blog posts on the Quilty Ramblings blog, sign up to the newsletter below to have my blog post drop straight into your email.

Related Posts

Creating applique flowers for the Adelicia sampler quilt. The applique method I like to use is turned edge and invis...
Read More
Today I am looking at some of the tips I have to share with you all for block one.
I made this block using two differ...
Read More
Hello Everyone
I hope you had a wonderful Xmas and New Year, with lots of promise and hope for things to come in 2022...
Read More7 Responses
Leave a comment


lucettejourdain
December 06, 2023
est ce que du papier a congelateur c’est du papier cire